A couple of good cylindrical grinding photos I located:
NASA Testing the Webb Telescope’s MIRI Thermal Shield
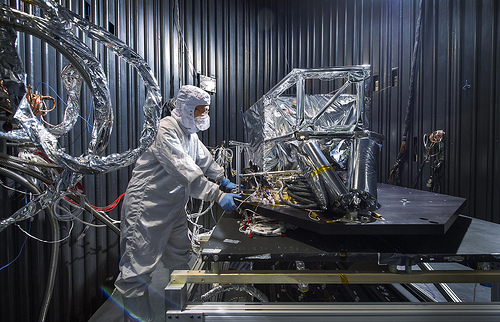
Image by James Webb Space Telescope
NASA engineer Acey Herrera recently checked out copper test wires inside the thermal shield of the Mid-Infrared Instrument, recognized as MIRI, that will fly aboard NASA’s James Webb Space Telescope. The shield is developed to shield the essential MIRI instrument from excess heat. At the time of the photo, the thermal shield was about to go through rigorous environmental testing to ensure it can execute effectively in the extreme cold temperatures that it will encounter in space.
Herrera is operating in a thermal vacuum chamber at NASA’s Goddard Space Flight Center in Greenbelt, Md. As the MIRI shield lead, Herrera along with a thermal engineer and cryo-engineer confirm that the shield is ready for testing.
On the Webb telescope, the pioneering camera and spectrometer that comprise the MIRI instrument sit inside the Integrated Science Instrument Module flight structure, that holds Webb’s 4 instruments and their electronic systems during launch and operations.
Webb is designed to obtain photos and spectra in infrared light that is invisible to the human eye. As a consequence, the Webb telescope and ISIM should be cooled to a really low temperature (-383 F or -230 C) in order to keep away from becoming blinded by their personal infrared emission. The MIRI operates over longer infrared wavelengths than the other Webb instruments and, as a result, must be created roughly 35 degrees colder than the rest of the ISIM. The MIRI’s thermal shield is essential to attaining this reduced temperature for the MIRI.
Herrera said the copper wires he’s looking at are located inside the silver box, are important for regulating the temperature of a mock-up of the MIRI instrument enclosed by the shield.
"The wire harness or black coils, half hidden from view at the front, is component of ground help equipment to a heat flow meter that aids regulate and monitor cooling of our test payload," Herrera stated. In the left of the photo are lines that will be filled with liquid helium that will cool the chamber.
Surrounding the shield are tangles of cables that offer power to heaters and lead to temperature sensors that will assist handle and assess how the shield intercepts heat. Components of the MIRI thermal shield are covered with aluminized thermal blanketing material to preserve them cooler.
Inside the thermal vacuum chamber, all of this hardware was tested in an atmosphere that mimics the powerful vacuum and cold temperatures that Webb will knowledge in space. Following Herrera and the others completed setting factors up in the test chamber, Goddard technicians sealed it up, evacuated all the air and lowered the temperature of the gear to 18 to 23 kelvins (-427 F or -255 C).
"The heaters here regulate the temperature of this large, black painted test plate," stated Herrera. "The copper wires in the center lead to a mockup meant to represent the volume of the MIRI instrument which will be enclosed in the MIRI shield."
The two black cylindrical parts at the front are protective pads covering two of six composite struts that will attach to ISIM the pads will be removed just before flight.
"These struts are created to limit the performed heat flow into the shield from ISIM," said Mark Voyton, MIRI instrument manager at NASA Goddard. "Underneath the shield is a black rectangular piece, part of the thermal shroud that mimics the MIRI shield’s atmosphere."
Engineers then utilised a Q-meter, a device designed to maintain temperature and measure the heat flow, to monitor the instrument. The test took three weeks to full.
The James Webb Space Telescope is the successor to NASA’s Hubble Space Telescope. It will be the most strong space telescope ever built and will observe the most distant objects in the universe, supply pictures of the 1st galaxies formed, and see unexplored planets around distant stars. The Webb telescope is a joint project of NASA, the European Space Agency and the Canadian Space Agency.
www.nasa.gov/mission_pages/webb/news/miri-test.html
Text Credit: Laura Betz
Image Credit: NASA/Chris Gunn
Subscribe to our YouTube channel
London – UK: Underground
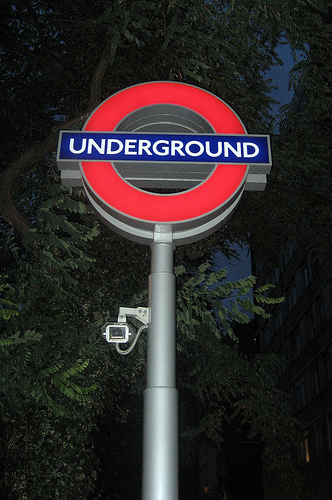
Image by wallyg
The London Underground is an all-electric metro railway system that covers significantly of the conurbation of Higher London and some neighbouring areas. It is the world’s oldest underground system, and is the biggest in terms of route length. Service began on January 10, 1863 on the Metropolitan Railway most of that initial route is now portion of the Hammersmith & City Line. Regardless of its name, about 55% of the network is above ground. Well-known regional names incorporate the Underground and, far more colloquially, the Tube, in reference to the cylindrical shape of the system’s deep-bore tunnels. The Underground at the moment serves 274 stations and runs more than 408 km (253 miles) of lines. There are also a number of former stations and tunnels that are now closed. In 2004–2005, total passenger journeys reached a record level of 976 million, an average of two.67 million per day.
The origins of the roundel, in earlier years identified as the ‘bulls-eye’ or ‘target’, are much more obscure. Even though the very first use of a roundel in a London transport context was the 19th-century symbol of the London Common Omnibus Organization — a wheel with a bar across the centre bearing the word Basic — its usage on the Underground stems from the decision in 1908 to discover a a lot more apparent way of highlighting station names on platforms. The red disc with blue name bar was quickly adopted, with the word "UNDERGROUND" across the bar, as an early corporate identity. The logo was modified by Edward Johnston in 1919.
Every single station displays the Underground roundel, frequently containing the station’s name in the central bar, at entrances and repeatedly along the platform, so that the name can simply be noticed by passengers on arriving trains.
The roundel has been utilised for buses and the tube for several years, and since TfL took manage it has been applied to other transport types (taxi, tram, DLR, etc.) in different colour pairs. The roundel has to some extent turn out to be a symbol for London itself.
56 Megapixel HDR Panorama – View from the Old Man Of Storr
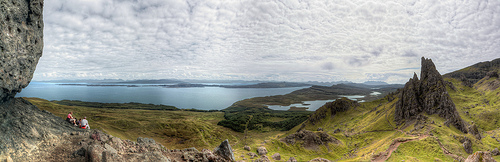
Image by Neil Melville-Kenney
This is a 180 degree HDR panorama from the Old Man Of Storr on the Isle of Skye.
Verify out the complete size version to zoom in and take a appear about: www.flickr.com/images/fijian_scion/6111849065/sizes/o/in/…
Source:
Shot handheld with Canon EOS 550D, f2.eight 17mm
Seven portrait captures across the panorama
Three exposures per capture, -2ev, , +2ev
Preparation in Canon Digital Photo Pro three.8:
Apply chromatic aberration correction
Apply noise reduction
Standardise white balance
Export all photos as 16-bit TIFFs
Exposure Stacking in Photomatix Pro four.1:
Open and merge every single triple exposure set
Apply selective de-ghosting as required (the men and women were moving)
Save the intermediate 32-bit Higher Dynamic Range photos as .EXR
Stitching:
Open the seven 32-bit .EXR photos in Hugin and enter lens and image data
Auto-generation, manual check and optimisation of control points
Apply Photometric Optimisation for exposure blending (not too effective, as you can see)
Set Cylindrical projection, field of view, and cropping
Stitch panorama to a 32-bit .EXR file
Tone Mapping:
Open the 32-bit .EXR in Photomatix (resize to 90% to avoid memory issues)
Apply tone mapping (particulars enhancer) with high smoothing, contrast and luminosity, and low white point
Save output as 8-bit TIFF (I only have eight-bit image processing computer software however)
Post-processing in Corel PhotoPaint six (vintage):
Produce masks for sky, water, background land, mid-ground land, and foreground land
Tone curve adjustments on sky and water (raise white level, increase gamma)
Graded tone-curve adjustments on back-, mid- and foreground (raise white level)
Graded contrast and brightness adjustments on back-, mid- and foreground
Partial blending in of people from the acceptable mid-exposure (they do not look correct in HDR)
Tweak colour balance and saturation of all components
Soften and blend mask edges
Downscale (to respect Flickr upload limit)
Export as 8-bit jpg
Lessons Learnt:
– When you attempt this for the first time, start with something easier! (I didn’t)
– A proper wide angle lens would call for fewer captures for the scene (though reduced resolution)
– Hugin has a steep finding out curve and is very buggy, but is quite strong and free stitching software
– Hugin corrected for the vignetting, but I could not get it to completely get rid of the varying exposure stripes. They could also be due to altering light for the duration of the shooting process
– Photomatix 32-bit, on Windows XP 32-bit, returns an error if more then 2GB RAM is needed, therefore there is a maximum image size that can be processed (otherwise this image would be 68 megapixels)
– Drop white point to zero prior to processing tone mapping in Photomatix to stay away from blowing out highlights
– Take all the necessary time to make precise masks for the separate areas of the image
– 16-bit image processing software would be a fantastic benefit for post-processing, I genuinely should buy myself a copy of Photoshop!